Saturday, September 26, 2009

Playdough


Fun activity to do with your kiddos - cheap and lasts and stays softer than the store bought stuff....doesn't smell as bad, and probably isn't as bad for your kiddos to eat as the store bought stuff too!

I especially like this recipe because if you have little helpers making this with you, it's pretty easy to divide up the steps so everyone gets to help as much as the next person.


PLAY DOUGH
1 cup flour
1 cup warm water
1/4 cup salt (I've used both kosher and table salt and it doesn't seem to make a difference)
2 teaspoons cream of tartar
2 TABLESPOONS oil
food coloring
Pour everything into a medium pot putting in food color last. Stir and cook over medium heat until thickened. I think it takes about 5 minutes. Once it starts coming together, dump it out and very carefully but immediately knead the playdough. (Don't let your helpers do this part) As you're kneading feel free to incorporate a little more oil into it. It will keep your playdough moist and long lasting. Knead playdough until it's cooled off then spread one more layer of oil all over the top of the playdough, and wrap tightly in saran wrap. Let rest 20 minutes before you let your helpers play with it....(I know 20 minutes seems like forever, but maybe you can have a snack while you wait?!) Enjoy!

Friday, September 11, 2009

Meatless Monday? Try this Polenta Pie!


Polenta Pie is by far one of my favorite recipes for the begining of fall. I original stumbled across this recipe in a Martha Stewart Everyday Food Mag. It was called something different (I've searched for the original recipe, but to no avail...) This recipe is great if you are looking for a meatless monday recipe. It would also work great as a side dish, although I love to eat just this for dinner. It's pretty reasonable to make too. I buy a tube of polenta at Trader Joe's for about $2.00. Then you need 2 cans of beans, and a can of tomatoes! That's only about $3.00. I add some garlic, cilantro and green onions, and you probably at $2.00 more - though you'll have leftovers of those, so it doesn't really cost a whole two bucks. Top it off with a little cheese and sourcream if you have it/want it, and it should cost you less than $10.00. My recipe makes two 9 in pies. Hope you'll give this a try!


POLENTA PIE


1 tube polenta (I buy the organic polenta from Trader Joes)
1 can pinto beans, drained and rinsed
1 can kidney beans, drained and rinsed
1 can diced tomatoes
2 small cloves garlic, minced
1 jalepeno, seeded and diced (I like to leave some of the rib intact for a little extra kick, but if you get rid of ALL the seeds AND the rib, it won't be spicy at all)
3 green onions, chop it all - save the chopped greens for topping!
1 handful cilantro - rough chop


In a medium saucepan, heat up some good old olive oil. 1 glug is good. Just enough to get the pan coated, you know? Once the pan is nice and warm, add the WHITE parts of the green onion and the jalepeno. Let that cook for a couple minutes or so. They should be soft-ish before you add the garlic. Once you've let the jalepeno and onion cook up, add the garlic. Cook for just about 30 seconds -(Now make sure you have your beans prepped and your tomato can OPENED before you get to this step - you want to be able to dump as soon as that garlic is done! If you cook garlic too long it get's bitter. Yucko Wucko!) Then dump in tomatoes and drained beans.
Cook on med-high for about 10 minutes. While it's cooking, smash about 1/2 the beans up with a potato masher or the back of a wooden spoon. Slice the polenta into round discs. One tube should be enough for TWO pie plates. Once the mixture has thickened up, add the cilantro and cook for one more minute. Put the polenta discs into the bottom of two pie plates, and then divide bean mixture between the two pans. Sprinkle with pepper jack cheese for a kick, or any other kind of cheese that floats your boat. Cook at 350 for about 20 minutes. Serve with lime-zested sour cream, and green parts of onion. Garnish with cilantro. Soo good.


Sunday, July 12, 2009

Chicken with Mango Salsa over a Sweet Potato


A couple weeks ago, Dave's family came into town. We had a great time visiting with them! While they were here, we went out to eat at a local chain restaurant. I ordered Jamaican Jerk Chicken over a Sweet Potato. It was so good, that I couldn't wait to get home to make my own version of it. If the sweet potato scares you, (I'm finding out that a LOT of people don't like sweet potatoes!) you could always make this into chicken soft tacos with a mango salsa. That's what I did with my leftovers! (Even though I only made enough for two, Dave isn't a fan of sweet potatoes, hence the leftovers. Here you go. Enjoy!

PREP THE SWEET POTATOES

Preheat oven to 350. Scrub and poke the potatoes. (No explosions please!) Pop the potatoes in the MICROWAVE for 4 minutes, and then finish the potatoes off in the oven. I like to do it this way: it's quicker than baking them from start to finish, but I don't like fully microwaving them because I think they get a weird texture.

MAKE THE MARINADE FOR CHICKEN
I originally found this marinade in a Rachael Ray cookbook. She was making something else, I can't remember what! But I thought, "This would be a great go-to marinade for chicken!" and it turned out it was. Its so easy to make, but if using a food-processor or blender scares you, I'd look for some Jamaican jerk rub at your local market and use that.

2 Tablespoons Olive oil
zest and juice of one BIG lime
1 handful of cilantro
1 clove of garlic, peeled
1/2 of a med-to-large jalapeno. If you don't like it spicy, make sure you remove the ribs and the seeds.(Cut 1/2 jalapeno into sizes similar to the size of garlic for easy processing. While you are already working with the jalapeno, dice the other half of the jalapeno up and reserve for mango salsa)
1 Tablespoon cumin
salt and pepper


Throw all ingredients into food processor, and pulse until it's nice and smooth. It should be like a dressing, but will like pesto from the cilantro. It seriously takes less than 5 minutes for this marinade and it's so worth it.

PREP THE CHICKEN

6 chicken tenderloins

Pour all over the chicken, and turn and coat the chicken. Make sure you get all the pieces good, you don't want any pieces of chicken feeling left out! Now at this point, you can either pop the chicken into the oven next to the sweet potatoes and cook, or you can grill them, too. I just to bake mine yesterday, mostly because I didn't feel like turning on the grill for such a little amount of food.


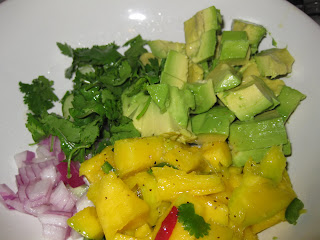
MAKE THE SALSA

1 large mango, or 2 small mangoes
1/4 cup of diced red onion
1/2 of a cucumber, peeled, seeded, and diced
1/2 of a jalapeno, diced
1 avocado, cut into small chunks
1 handful chopped cilantro
1 lime (just the juice) I usually microwave my limes for 30 seconds before I juice them. I get a lot more juice that way.
Salt and pepper to taste

I really liked this salsa! Next time I might throw in some red pepper, jicama and perhaps a peach.


Check on your potatoes and chicken! By now, they should be done, or at least really close.

To assemble cut potato in half, brush with butter, and a little bit of honey. Put chicken on top of potato, and salsa on top. If it's a little spicier than you want, serve with fresh lime juice and sour cream. Enjoy!

Sunday, March 22, 2009

Parmesan Baskets


I found this recipe in a culinary magazine under a section for "making week nights special." When I first read the magazine I laughed at it. I mean who has time to make something like this on a week night? But then, I thought what if I made this on a weekend instead...so I tried it, and it was difficult to get all the quirks worked out, but well worth the effort.


First use a non-stick small skillet. Sprinkle fresh grated parmesan into a cold skillet. Turn your skillet on med - low to medium.


You don't need a lot of parmesan, just enough to cover the bottom of the skillet.


Let the cheese get good and melty. Don't be in a hurry! If you're worried about it burning, turn the burner off before it's all-the-way done and leave it on the hot burner.

Now here's something I learned with the last batch of parmesan baskets I made! You don't have to get the cheese out of the pan right away! (trust me, your fingers will thank you for this!) Remove the pan from the hot burner and allow the cheese to cool and harden up a bit. Run a knife underneath the edges of the parmesan to loosen it up a bit. Now for the tricky part. You have to get the parmesan out of the pan, and wrapped around a china cup or small bowl or whatever kind of mold you want to use. I use a china cup turned upside down.

The best thing about these parmesan baskets is that they can be made early in the day, and then set aside til you're ready to serve them. Its versatile, too. You could serve a ceasar salad, a spinach salad (like the one pictured above) or even a fruit salad! So much fun to make!

Sunday, February 1, 2009

Northwest flavors (MattMatt's birthday) Finale

Quick Strawberry Trifle

I found this recipe on http://www.cookscountry.com/. This is the second time I've made this recipe and I can't say as if I changed it up at all, or made it my own in any way, so I can't post the recipe, but here's some pictures for your enjoyment.

First I cut up four lbs of strawberries! That's right, 4 lbs! There were 13 people coming over for dinner (or 11 plus Dave and I) and my family's motto has always been "it's better to have too much, than too little."

Time to add a little sugar to make it sweeter!


And with four lbs. of strawberries, you have to have lots of angel food cake. So I used two angel food cakes, and then cut them into large chunks. Using store-bought angel food cake was a life-saver on this day!


Time to assemble: angel food cake, whipped cream with cream, sour cream, cream cheese (all low-fat of course!) almond extract and all sorts of yummy goodness, strawberries. Repeat layers over and over again until you get this:

(shot from the side)


(shot from the top)


Saturday, January 31, 2009

Northwest Flavors (MattMatt's birthday) part III

Time to think about mains. I really like using local ingredients and ingredients that are native to Washington state. What says "Washington" more than apples, and salmon?! We have some picky eaters in my family, and only about 1/2 of them like seafood, so I made one salmon dish and one chicken dish. Don't forget bacon is still our theme. I'm embarrassed to say until this point I had NEVER made salmon before. I knew I wanted to grill it. And I knew I wanted a marinade that would be a little on the sweet side - nothing too over-the-top. (To please the picky eaters of course!) So off I went to the world wide web, to see what I could find as far as grilling salmon goes. I finally stumbled across a marinade that I thought was perfect for what I was looking for.

SWEET AND SIMPLE GRILLED SALMON

This recipe is from ALLRECIPES.COM and is called grilled salmon 1. I'll post the link here so you can see the original recipe, and below I'll show how I made it. I do like seafood on occasion, but I don't love it. I have to say this made me LOVE salmon. What a great marinade! http://allrecipes.com/Recipe/Grilled-Salmon-I/Detail.aspx (real recipe!)
2 1/2 pounds salmon fillets
2/3 cup soy sauce
2/3 cup brown sugar, packed
2/3 cup water
1/2 cup olive oil
2 cloves garlic, minced
1/2 inch piece of ginger, peeled and minced
juice from 1/2 lemon

Lay fillet of salmon in a 9X13 or other dish. (You'll be marinating the salmon in this dish, so you'll need room for liquid) Sprinkle salmon with freshly ground pepper, and lightly season with salt - don't forget the soy sauce is pretty salty so go easy on the salt, or skip it all together) In a small bowl, combine the rest of the ingredients and whisk until well blended. Pour over the salmon, turning the salmon to make sure it's well coated. Allow to marinade for at least 2 hours, but it's even better if it can marinade for 4 hours. Preheat grill (all burners on high) for 10 minutes, or until hot. While grill is preheating make a foil "boat" for the salmon." When grill is preheated, turn side burners to med-high. Grill for 12-15 minutes on indirect med-high heat, checking after 10. So delicious, and goes well with side salad, and winter sangria!

BACON CHICKEN ROLL-UPS
A few months ago now, I went to trader Joe's and bought some pre-packaged apple stuffed chicken breasts. Great idea! Unfortunately, these particular chicken breasts were very bland, and had very little apple in it. So I went home a couple weeks later and started on a recipe hunt that would last a few months. I tried making pockets in the chicken breasts and filling them with apples, but I had the same problem as TJ's. Not enough apple with the chicken. I tried making chicken and just spooning apple goodness over the top and it was OK, but not great. Finally after pulling ideas from many different recipes, I finally have a recipe I love!


4 chicken breasts
8 pieces of bacon
2 apples
1 cup shredded sharp cheddar cheese
Johnny's seasoning
pepper
1 cup apple juice, or chicken stock, or sherry (my favorite!) or a combination of any of them
honey

First things first as I always say. You want to put the bacon into a fry pan, and cook over medium heat for just a few minutes. You want to barely cook the bacon as it is going to cook later. Next fill up with a medium bowl with water, add some salt. Start chopping up the apples, and as you chop, pop them into the water.


Now pound the chicken breasts really thin. About 1/4 inch thick if you have the patience. Season up one side with johnny's seasoning, or any seasonings that sound good. I have a blend of spices called "basil and citrus rub" that I use a lot and that goes well with this, too. On the other side. Pile up some apples, cheese, and honey, and then dot with butter.


Now roll up the chicken breasts and wrap two pieces of bacon around each chicken bundle. Secure with a toothpick if it's rolling around too much. Place in casserole dish. Fill the dish up about halfway with liquid. (Sherry, apple juice, chicken stock, etc) Cook at 350 for 35-45 minutes or until done.


Northwest Flavors (MattMatt's Birthday) Part II

Time for appetizers! I made 3 bacon appetizers. They were all recipes I hadn't ever tried before, and the bacon bundles definitely need more tweaking, but here they are in a nut shell...


Bacon Garlic Bread sticks


I first saw Paula Deen make these on one of her shows with her sons. I thought to myself "who would ever eat these?!" But they went perfectly with my bacon theme, and I have to say, they were delightful! No one can eat just one. I didn't actually go look up her recipe online, so her recipe might have included other things...


Bacon

Freshly grated Parmesan

Garlic Bread sticks (the hard kind!)


Cut the bacon in half in long strips. Cover the bacon with Parmesan. You can't ever have too much Parmesan! Then wrap the bacon around the bread sticks. Place bacon wrapped bread sticks on a cooling rack in a cookie sheet, so the fat drips off the bread sticks. Cook in the oven around 400ish degrees for about 10 minutes. This is a very fudge-able recipe, and if you are cooking other things you can certainly adjust the temperature to accommodate the other food you're cooking. The time it takes to cook them will change depending on the temperature.


Bacon Wrapped Dates


I'm so sad that I didn't take pictures of this appetizer. They were so good, I didn't have time to take pictures before they were gone. This recipe I've always heard about, but I'm not a big fan of bacon, and I've never liked dates/figs. This past year at a Christmas party I went to, a couple brought bacon wrapped figs for an appetizer. I took one to be polite, and was amazed to find how good they were. Here's my version:


1 package pitted dates

almonds

bacon

toothpicks

Stuff one almond into each date. (It's really easy since the dates are pitted, just put the almond into the hole the pit came out of!) Wrap each date with bacon, secure with toothpicks. Place the bacon wrapped dates onto a cooling rack, and place in a baking sheet. Cook at 400 for about 10 minutes.


Bacon Bundles


This recipe I found on the Kraft website. I followed the recipe pretty much word-for-word, and didn't think it was the greatest...but I do think it has lots of potential and next time I feel like experimenting, I'll probably work on this recipe again. For now, I'll leave you with a picture.